bitter/burnt tasting espresso after trying everything on Rancilio Silvia ?
The main fuel that runs the man cave is great tasting espresso so when it starting tasting burnt/bitter (you espresso lovers out there know 'that' taste) and after trying all the usual culprits i.e fresh beans, check grinder settings, water temp, water quality, descale Silvia, clean Rocky grinder, regular backflsuhing STILL problem not solved SO yesterday I solved my problem by taking apart the 3 way valve and fully cleaning as illustrated below:
warning: don't let people tell you that you're not doing this or that right, you'll break something, bring it into the dealer blah blah blah...it's easy & straight forward and should be part of an annual or bi-annual maintenance SO let's get started:
Espresso Machine: Rancilio Silvia V3
Time: 1 hour (includes running around trying to find my needle nose pliers :-)
Tools: philips screwdriver, adjustable wrench, needle nose pliers (or small adjustable wrench), hex key, small flat screwdriver/knife blade
Materials: coffee machine cleaner/detergent, toothbrush/ brittle brush, ear swabs, small plastic container
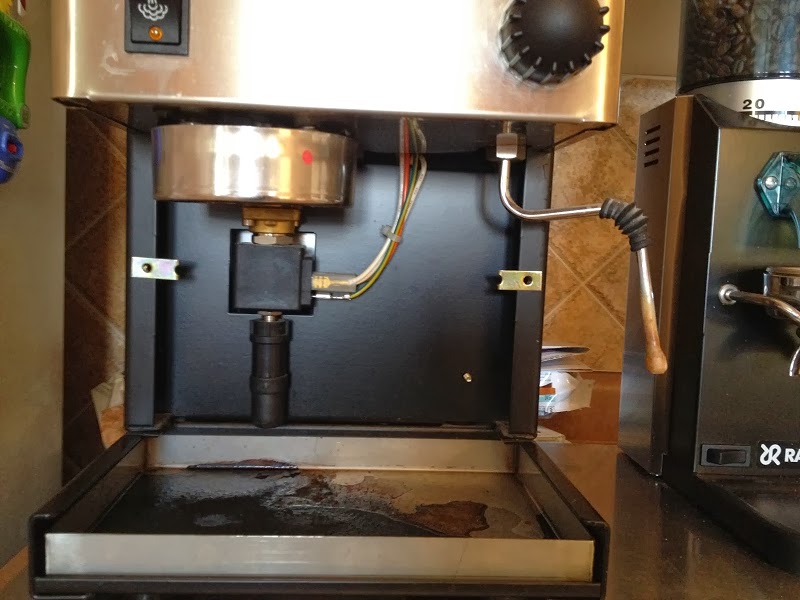
Step 1: remove 2 philip screws to remove stainless steel cover plate at base of Silvia above the drip pan.
Step 2: view when you slide the cover plate off (you'll see that you can't pull the plate forward because the filter head blocks it so gently nudge it slowly to the either side and it comes off easily.
Step 3: remove the drip tube at the bottom of the solenoid (small metal black box). I couldn't take if off by hand so used an adjustable wrench very lightly (as it's plastic) just to initially loosen it. Once loose I removed the tube by hand.
Step 4: here's what it looks like once the drip tube is
removed.
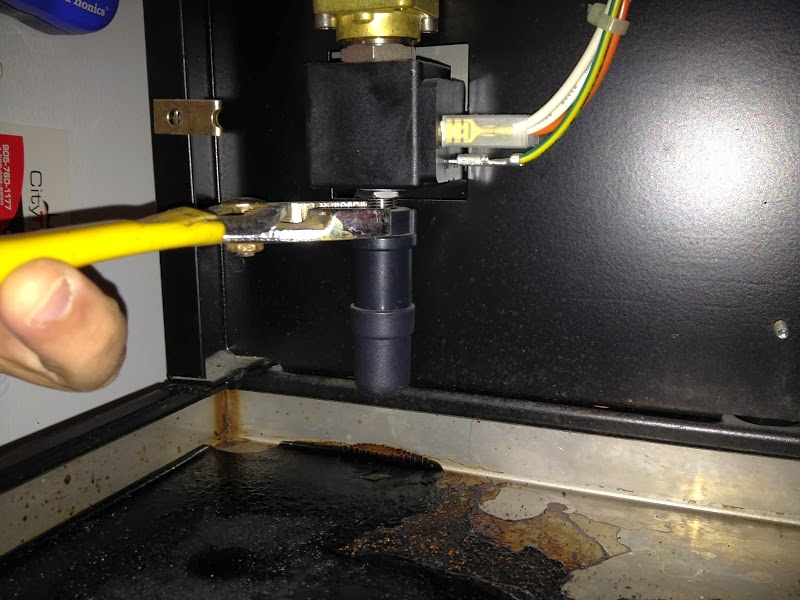
Step 4a: remove the lock nut and 2 washers with needle nose pliers or small adjustable wrench. I had to support Silvia from twisting as it was on quite snug.
Step 5: once the lock nut is off take a small flat screw driver or knife blade and remove the 2 washers stuck beneath the solenoid unit. Keep them in the same order you took them out so you remember the order to put them back
Step 6: disconnect the 3 wire connectors to the solenoid (gently wiggle them while slightly pulling as they are on nice and tight and a pulling action alone won't do...well it might but then you'd cut your hand on the stainless steel siding LOL).
Step 7: the solenoid should just slide off after step 6 but in my case it was too tight against the back plate so I just pulled it down as far as it can go so there was a gap large enough to get my adjustable wrench in to get to the stainless steel nut of the 3 way valve just above the solenoid.
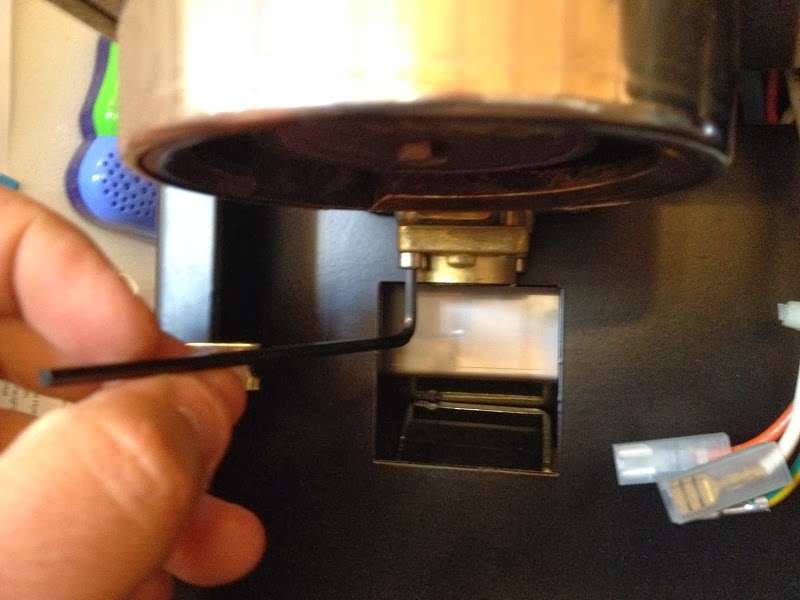
Step 8: here's a pic of the 3 way valve stem and solenoid beneath it.
Step 9: what the 3 way valve and stem look like when you slide the solenoid off. IMP: take note of the orientation of the 3 way valve for when you have to reassemble it after cleaning!
Step 10: the 3 way valve in 2 pieces and now we can see all the embedded black tar like stains from the coffee bean oils!
Step 11: back to Miss Silvia we go to remove the brass fitting with a hex key (there are 2 screws). Make sure that the hex key is very snugly fit as you DON'T want to strip the screws or the brass fitting as it's very delicate compared to stainless steel!
Step 12: once the 2 screws are off you'll have to use a small flat head screw driver or sturdy knife blade to gently pry the brass fitting off the main unit. Gentle prying motions on each side will do the job without damaging the brass. DON'T BE AGRESSIVE HERE...EASY & SLOW IS THE WAY TO GO :-).
Step 13: off without a dent or scratch !
Step 14: what the brass assembly with 2 screws look like. Note the grundge atop the 2 small washers.
Step 15: turning the brass assmebly supporting the 3 way valve over, we see more of that caked on black tar from Step 10!.
Step 16: put the three black tar culprits into a small platic ciontainer filled with hot water and coffee machine cleaning solution (any brand will do here as I've tried every make with good results). It's important to make sure the water is very hot to the touch and also that all parts are fully vovered with water. Let sit for a good 20 minutes.
Step 17: after waiting a good 20 minutes grab your toothbrush, small bristle brush etc and start scrubbing!
Step 18: ah nice & clean !
Step 19: now trace back the steps above and put Miss Silvia back together making sure to not over torque all screws (one quarter turn after snug if all you need).
Put fresh water in the tank and run the it through without he portafilter for a minute or so, then make a few espressos and throw them in the sink. NOW make yourself a well deserved shot and ahhhh ya that's the aroma and taste that made you get out your tools and waste time doing this repair right LOL
ENJOY E BUONA SALUTE !!!